To Create a Pass Fail Assessment, there are 4 sets steps to be taken:
C. Create the assignment and link it to existing grade item
D. Enter the grades for completed assignment.
1. Select Class Organisation > Grades.
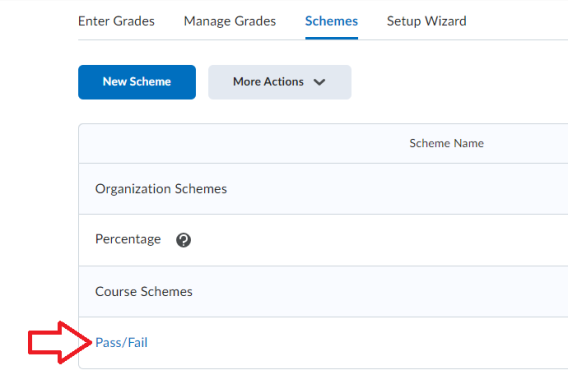
2. Select Schemes > New Scheme.
3. Enter a name and short name. In the example here, we have chosen Pass Fail Assignment and PFA as the short name.
- Symbol* - enter letter grades (A+, A, B+, B, and so on) or Pass/Fail.
- In the Start % percentage column, the first range starts from 0.
4. Associate a colour with each range in the grade scheme.
Assigned Value % defines the numeric grade you want learners to achieve when you evaluate them using this grade scheme.
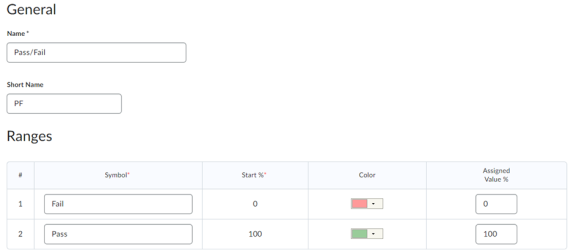
Optional: If you wish to add more grade ranges, enter the number of ranges you wish to add and click Add ranges.
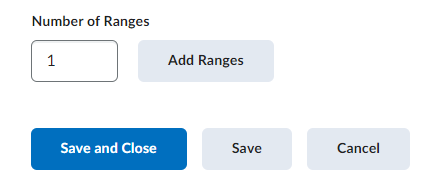
5. Click Save and Close.
Result
The new grade scheme will display in the schemes list - Pass Fall Assessment now available for use.
For additional information on creating grading schemes, watch the video tutorial shown here -
Create Grading Schemes using the Grades tool.
To create a grade item with a grade scheme –
1. Select Class Organisation > Grades.
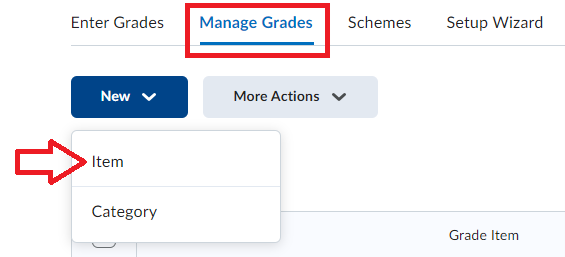
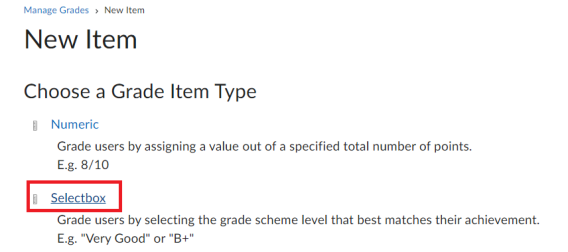
2. Select Manage Grades > New Item.
3. Choose a Grade Item Type > Selectbox.
Note: Use Selectbox rather than Pass/Fail box as this will allow you pick the Pass/Fail created in Step 1.
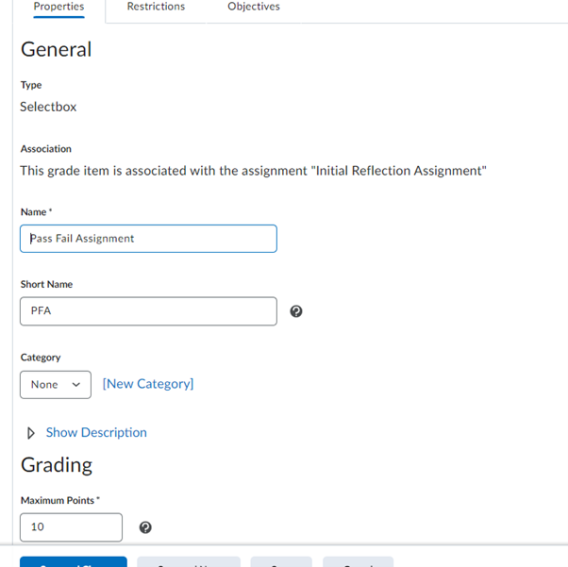
The Properties tab of the Selectbox opens.
4. Enter a name and a short name. Note: the short name is an abbreviation of the full name that you can easily identify and is only visible to you.
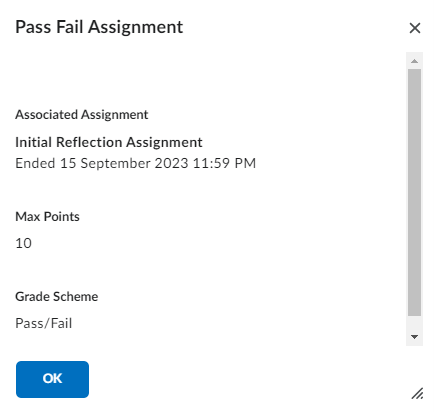
5. Enter the Maximum Points, this is the desired maximum grade value (10 entered).
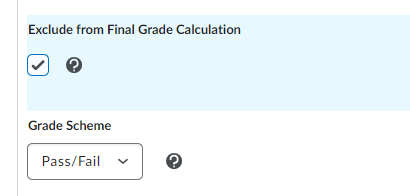
6. Tick the Exclude from Final Grade Calculation if you want the grade item to be excluded from final grade calculation.
7. Under Grade Scheme, select the Pass-Fail Assessment previously created.
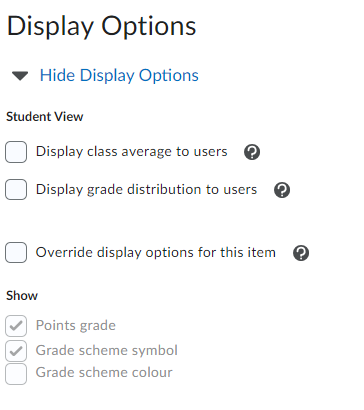
Optional: Display Options - There are options for the student, you can Display class average to users, this allows users to see the class average on the item. Display grade distribution to users, this allows users to see a graph showing how grades were distributed between different percentiles.
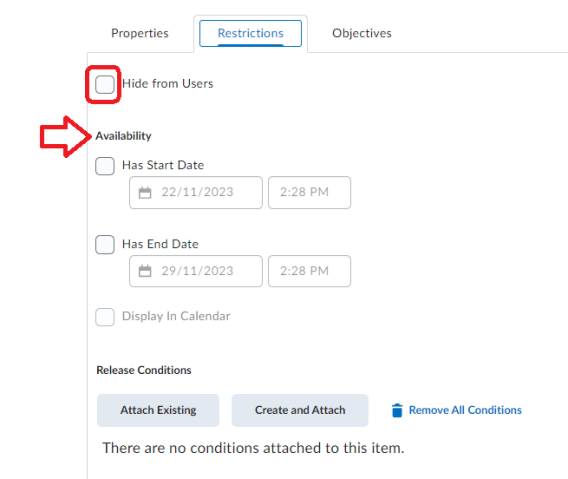
Optional: Select the Restrictions tab.
- If there is something in the gradebook that you want hidden from the students, you can choose to select Hide from Users. This will only be visible to you and not your students.
- You can also select an Availability date making it available by a particular date.
8. Click Save and Close.
Result
The Pass-Fail assessment can now be used in your assignment.
C. CREATING THE ASSIGNMENT AND ADDING THE LINK TO EXISTING
Create a new assignment.
1. Select Course Tools > Assignment.
2. Select New Assignment or update an existing assignment.
3. Enter a name for the assignment.
4. Grade Out Of – Select the drop-down called Edit or link to existing.
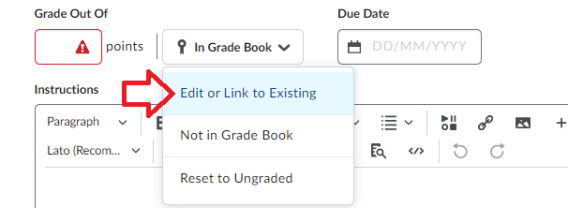
5. Select Link to an existing grade item called Pass Fail Assessment (created in the previous series of steps, B. Manage Grades).
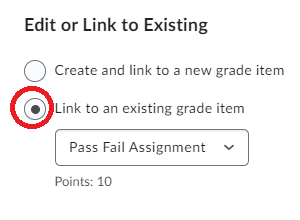
The Grade Out of automatically updates to 10 as set in the previous step.
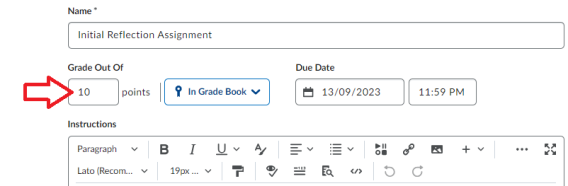
6. Set up the remaining items – Due Date/Start Date/ End Date.
7. Submission & Completion – only store the last upload.
8. Click Save and Close.
Result
The assignment has now been created and linked to an existing item.
HOW TO KNOW IF AN ASSIGNMENT IS LINKED TO GRADES (FROM ASSIGNMENTS)
Select Course Tools > Assignments and view the list of Assignments, you'll know an assignment is linked to Grades when it shows a ribbon next to the name as highlighted here:

HOW TO KNOW IF A GRADE ITEM IS LINKED TO/ASSOCIATED WITH AN ASSIGNMENT (FROM GRADES)
Select Class Organisation and Grades
In the Association column, any grade item linked to an assignment will show the assignment.
Click the question mark (?) to see which assignment the grade item is linked to.
D. ENTERING THE GRADES FOR COMPLETED ASSIGNMENT
1. To enter a grade individually – select Course Tools and Assignment.
2. From the list of students who have submitted a file, click on one of the submitted files.
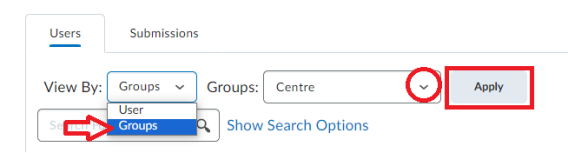
Note: if you have created groups for your assignment, click on the assignment in question and then select Groups from the drop-down, select the group from the Groups drop-down and hit Apply
This takes you to the evaluation page. Here you have many options for assessment and providing feedback – assign a grade/ add test/ upload feedback/add video or audio feedback.
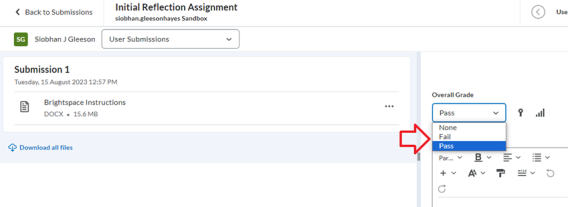
3. On the right-hand side, enter a Pass/Fail result from the drop-down.
Optional: After leaving feedback and assigning a grade, you can Publish feedback immediately or Save Draft and release it at a later time. This enables you to revise and review evaluations and publish your feedback to multiple users at the same time. You also have the option to retract published feedback if you want to provide an update to past evaluations but only want learners to access your most recent feedback.
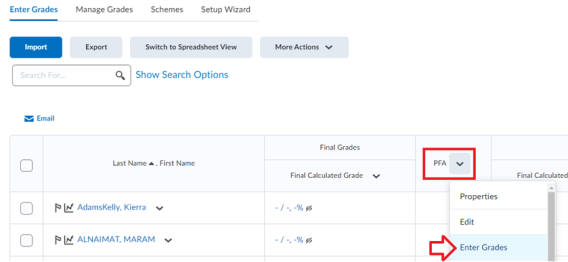
Alternatively, select Class Organisation > Grades.
Note: Grades can be uploaded in bulk or entered individually.
Use the View By setting to indicate that you want to show all the users in a class, groups, or sections within the course.
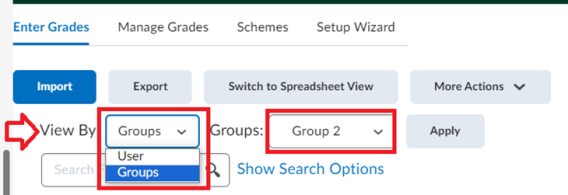
4. Select the arrow next to the assessment. The PFA (Pass Fail Assessment) assignment column is visible only to the lecturer.

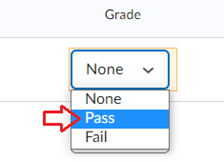
5. Enter the grade for the student by selecting the drop-down from the PFA and Enter Grades.
6. Select Pass.
7. Click Save and Close.
The results are displayed.

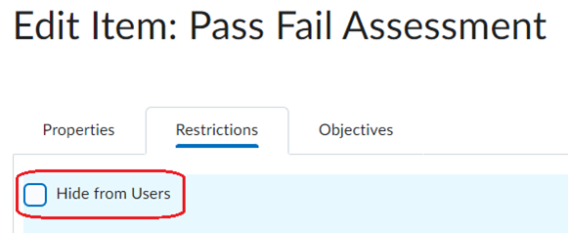
The Grades are hidden from the student until made visible. To make it visible, select PFA > Edit.

8. Select the Restrictions tab and untick the Hide from Users tick box.
Result
The student will then see the result.
