This article contains two sections:
A. Steps on how to complete this task
B. Videos that demonstrate how to create a number of different types of rubric
A. Steps
Creating a rubric
To create a rubric:
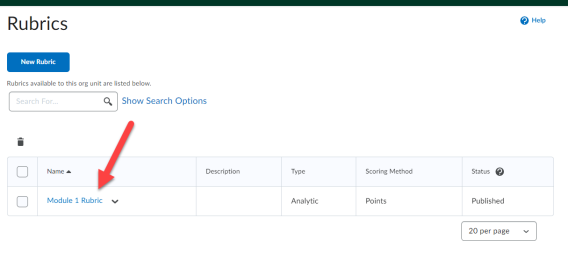
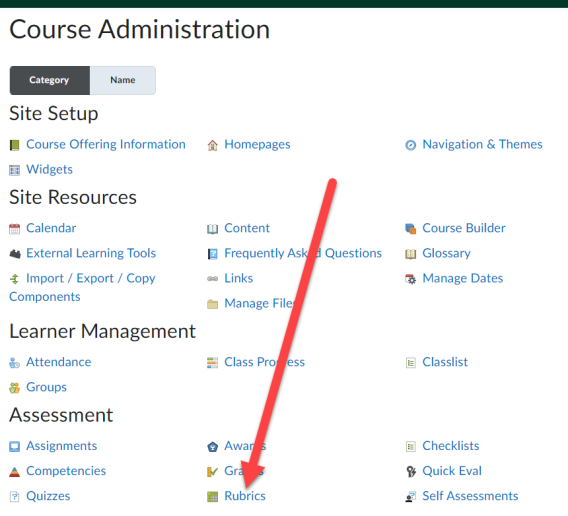
1. From Course Admin, click Rubrics.
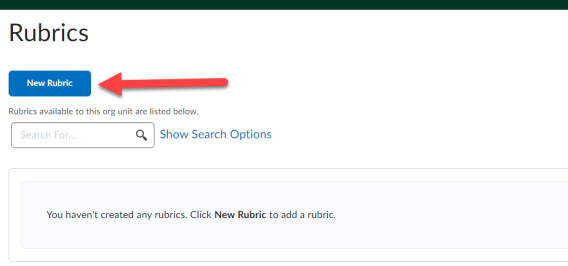
2. On the Rubrics page, click New Rubric.
3. On the Edit Rubric page, enter your rubric details:
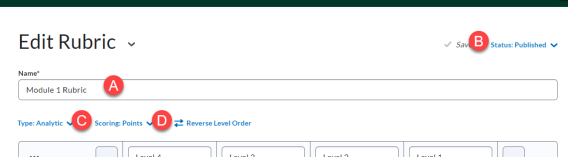
A. Name should contain a unique name that enables you to identify it in a list. Consider whether this rubric will be reused or imported into other courses when you choose a name.
B. Rubric Status indicates the availability of the rubric. The help text icon that appears next to the Status column heading provides descriptions of all the status options and provides information about the available interactions with archived status rubrics. For more information, see: About Rubric status options.
C. Type indicates whether the rubric is analytic or holistic. For more information, see: About Rubric types and Scoring options.
D. Scoring indicates whether you are using no score, points, or custom points to assess the rubric. For more information see About Rubric types and Scoring options.
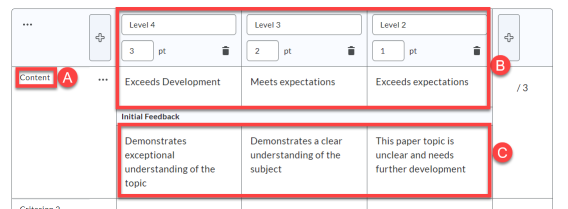
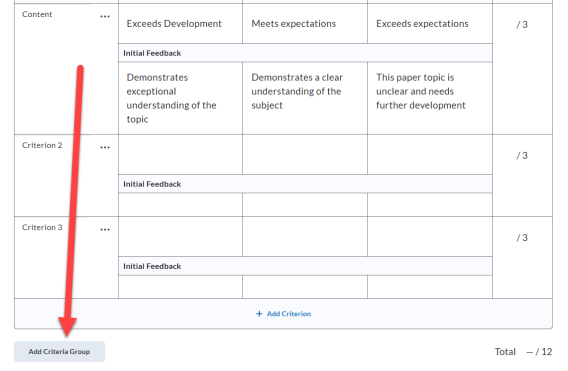
4. Enter the criteria you intend to assess against, one on each line of the rubric, replacing the Criterion 1, Criterion 2, and so on placeholder text. The criterion here is called Content (A).
5. Define levels on the rubric (B). The example here contains 3 levels; however you can add more to the left or right of the existing levels using the + buttons on the level heading row. Depending on the type of scoring you choose, you can also define the points for each level or for each criterion.
Optional: Add initial feedback for each level (C).
6. Click Add Criteria Group if you want to group the criteria.
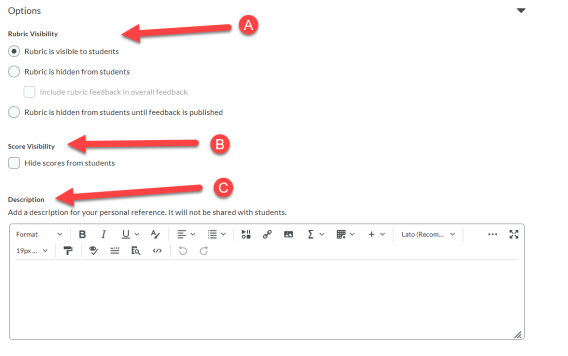
7. At the bottom of the Rubric page, click Options and define additional rubric attributes:
- Select the appropriate Rubric Visibility (A). For more information, see Controlling visibility of rubrics.
- Select the appropriate achievement level mapping you want to use. This feature only appears when the scale has percentage values defined and is only enabled for points-based and custom points-based rubrics. For no score rubrics, the threshold marker placement is suggested and adjustable since there is no score calculation in the rubric. Do one of the following:
- If you want to map scores automatically, select Automatically map achievement levels to percentage scores.
- If you want to adjust scores manually, select Manually map achievement levels to rubric levels. For more information, see Edit Rubrics
- Click Hide scores from students (B) if you do not want learners to see their scores. The default is to show scores.
- Enter a Description (C) to better identify the version of a rubric when its name is being reused for a current rubric. The first two rows of the Description appear in the Rubric Selection dialogue.
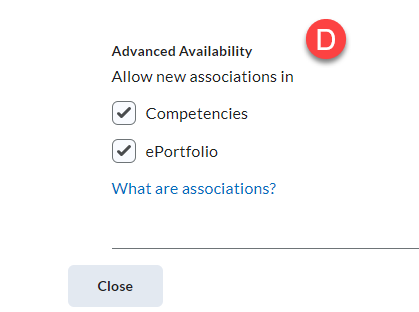
- Indicate if you want to use Advanced Availability (D) by associating a rubric with a tool such as Competencies or Brightspace ePortfolio as a means of assessing items created in those tools. When you create an association for a rubric, you cannot edit or delete the rubric. To make changes after associating it with a tool, you should change the rubric’s status to Archived, then copy the rubric and make your changes to the new copy. To associate your rubric with Competencies or Brightspace ePortfolio, select the Competencies or ePortfolio check boxes. In addition, you can click the Add Org Units button to share a rubric created at the organization level with other org units.
8. Click Close.
Result
The new rubric has now been created