By Michael Johnson.
Reading Time: ~5 mins.
Featured Image Source: Screenshot of video by Michael Johnson on YouTube.
Note: A variety of tools and technology resources are referred to which are intended to place the focus on the pedagogical approach and the transferability of the educational practice to other contexts. This does not imply endorsement of tools used and UL staff who teach are encouraged to use supported tools when possible.
In this post:
Introduction
In part 1 of this post, I discussed transcribing the engagement/interaction of a classroom whiteboard setting into an online class or pre-recorded lecture space. In part 2, I'm going to outline the technical detail of the process that I used to make the videos. I was quite happy with the technical finished product(s) - confirmation bias, mere exposure and a general dislike for seeing myself on video aside :)
Step 1: Pre-Recording
Before recording the video, the first step is to prepare the notes/slides I would interact with in the video. After some discussions and investigation, I decided to use an iPad and iPencil for this. Many thanks to Paddy Johnson for all his input(s) here. On the iPad, I opted to purchase and use the paid version of the "Explain Everything Basics" app (previously named Explain Edu) for presenting the content. The app allowed me to create hand-written slides from scratch which I could annotate during the actual video, import existing slides or pictures which could be presented as part of the presentation and record the screen video/audio as part of the process. I found this step to be the easiest of the three - once I had figured out the functionality and tool location(s) in the Explain Everthing app workspace.
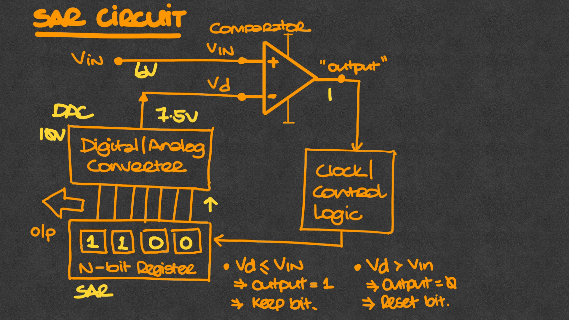
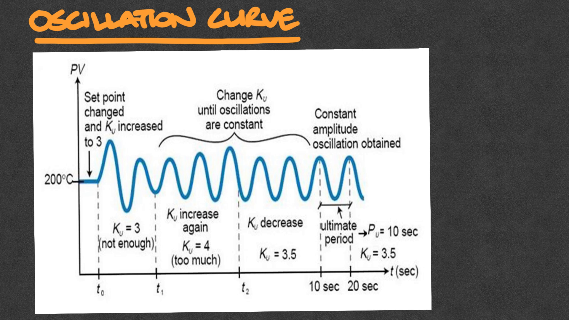
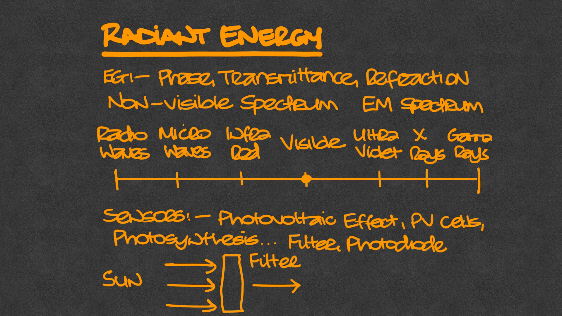
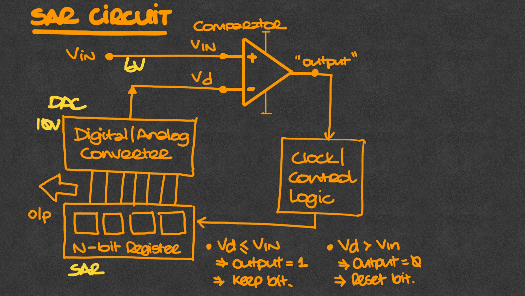
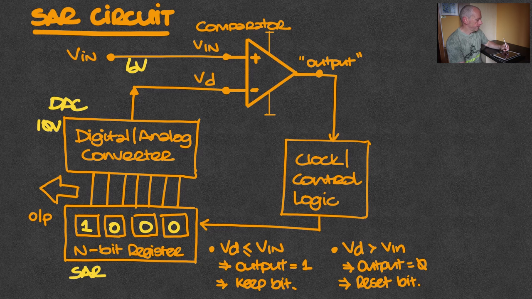
Click the images below to see a showcase of a selection of content from lecture slides I prepared in the Explain Everthing app.
Step 2: Recording
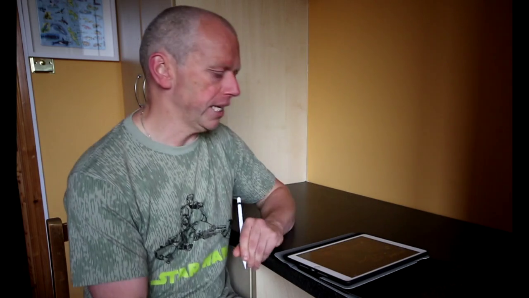
For the actual recording of the video(s), I had two video recordings running in tandem for the Picture-In-Picture (PiP) effect, which were to be combined later in Step 3. The first was the recorded video (and audio, but I discarded this audio feed in post-processing) feed from the iPad, showing the screen, slides and any notes, etc. I scribed as the presentation progressed. The second video recording was video/audio of myself at my desk doing the presentation on the iPad. For this, I used a USB webcam (mounted on a tripod off-center, so the video would show me and the iPad/desktop) as well as a USB microphone recorded on my PC. A big thanks to Eamonn Curtis here for his invaluable audio/video expertise in this process. This step took more time than originally anticipated, but was relatively straightforward – worse case, a re-recording would be needed because I had not actually clicked the record button on the video when I started it! :)
Click on the next set of images to view a general overview of the video recording process including the iPad screen recording, the webcam recording, and the combined final picture-in-picture (PiP) output.
Step 3: Post-Recording
The post-recording work turned out to take the most time and required particular attention to detail in some regards. The video creation step here was a two-fold process. First, I ran the presentation audio through Audacity (https://www.audacityteam.org/ - a freeware audio recorder/editor) which allowed me to improve the quality of the audio track. After doing this once, you realise that it makes a huge difference to your final video product and the impact it can have on the listener of the video. Second, I used DaVinci Resolve (https://www.blackmagicdesign.com/products/davinciresolve - a video editing application similar to Adobe Premiere) in order to timeline, edit, synchronise and eventually render the completed video for the lesson. While the process was not overly complicated, perfectionists could find themselves spending lots more time than anticipated here getting everything “spot on” before clicking the render button :) DaVinci Resolve would then render the video to your desired specifications, which could then be uploaded to Sulis, YouTube or your preferred sharing platform.
 in DaVinci Resolve")
Conclusion/Summary
Part 2 of this post has presented more of the technical detail and process surrounding the creation of the more interactive/engaging video format for asynchronous lessons. The videos and associated effort were well received by the students for the module. The time and workload involved in preparing ~6 of these “short” videos per week over the course of the semester was much more than originally anticipated. However, the finished products are re-usable across different modules or subjects dealing with the same topic space and will provide valuable learning aids and resources for the students, going forward. As mentioned in my previous part 1 of this post, if anybody has any feedback, suggestions for improvements, recommendations or would like to ask a question, I would love to hear from you (Michael.Johnson@ul.ie). Many Thanks :) !